So we had this island. It was very useful and we liked it a lot. But its "backside" needed a little work:
Just the unfinished back and sides of the cabinets. But I had a plan, or at least an idea that I had torn out of a magazine, and I showed it to Troy. He said, "I can do that." And off he started (a couple of weeks ago)...
We used OSB since we knew the surface would be painted. First a base layer which concealed all:
Then Troy piled layer upon layer to build my dream. Here we are "mocking it up" when my sister was visiting:
Then he dressed it up with some trim:
Then it was my turn. First some primer:
Troy thought it was really cute that I used a drop cloth to protect our subfloor. (An old shower curtain--they make great drop cloths because nothing soaks through. But nothing soaks up either, so you have to watch you don't step in a drip or spill.) Anyway, there was no way I was going to live with a messy paint job for a few months (or years) even if it was going to be covered up later.
The the real dressing--the gloss paint:
Remember I had to fight for it at Lowes? Totally worth it.
And finally, the corbels I found online a year or two ago:
They're a mismatched set and I still really like them. I'm a little unsure of the dark wood finish with the paint, but I'm sticking with it. (Besides, Troy won't let me paint them, even if I wanted to.)
This was a fairly quick project, partly because Troy was really gung-ho to get his part done. And partly because it's a nice small project and not a freaking giant 30 x 70' wall!! (Ok, sorry, flashback to working on the shop there. I've got a hold of myself now.)
The only snag was when I realized Troy did the base trim correct on one side, and for some reason a different way on the other side. When I gently pointed this out to him, he tried to convince me that it was ok and I would love it, but I soon talked him back to the side of reason. He pondered the fix over a day or two (at first he thought it would be really easy, but then he kept realizing how well he secured everything to everything when he made it and then it would seem hard again), and then did a very nice job of fixing it so I could finish painting.
As this is one of the first things you see from the front door as you look into the kitchen, I wanted to to be a real feature. I'm very happy with what we ended up with.
The process of converting a lovely old farmhouse into an efficient cheap-to-heat comfortable home and the life we lead while doing it.
Showing posts with label island. Show all posts
Friday, December 14, 2012
Monday, June 04, 2012
Further Disaster Leads to Further Delay
This is how we left the island tile when last we spoke.
On Sunday I ramped myself up to get the rest of it done. I marked all the tile and then took out one of the broken tiles to practice on. Just to see if it was any different than cutting the porcelain tiles. (I've never done this before; what do I know?)
This one came out quite good. You can see I have two nice 6" squares out of the tile. They'll make pretty (and hefty) trivets.
Then I went to cut the first tile I would have to use, and suddenly CHINK:
There it went. The tile cracked along a vein (I assume), right across the part that I needed to not crack. That is when I stopped. I wasn't pushing too fast (I thought), so I didn't know what to do to make the next one not do the same thing. I did do some rearranging of the tiles (the few I have left) and made it so I'm cutting the less veined tiles.
We're going to get a new blade and see if that will help. But that means it's not getting done this week. If you have any tips, let me know.
I have two spares still I think, but if I go over that, I will have to buy another box of ten and that will hurt with a capital $.
On Sunday I ramped myself up to get the rest of it done. I marked all the tile and then took out one of the broken tiles to practice on. Just to see if it was any different than cutting the porcelain tiles. (I've never done this before; what do I know?)
This one came out quite good. You can see I have two nice 6" squares out of the tile. They'll make pretty (and hefty) trivets.
Then I went to cut the first tile I would have to use, and suddenly CHINK:
There it went. The tile cracked along a vein (I assume), right across the part that I needed to not crack. That is when I stopped. I wasn't pushing too fast (I thought), so I didn't know what to do to make the next one not do the same thing. I did do some rearranging of the tiles (the few I have left) and made it so I'm cutting the less veined tiles.
We're going to get a new blade and see if that will help. But that means it's not getting done this week. If you have any tips, let me know.
I have two spares still I think, but if I go over that, I will have to buy another box of ten and that will hurt with a capital $.
Thursday, April 05, 2012
Seeing Red
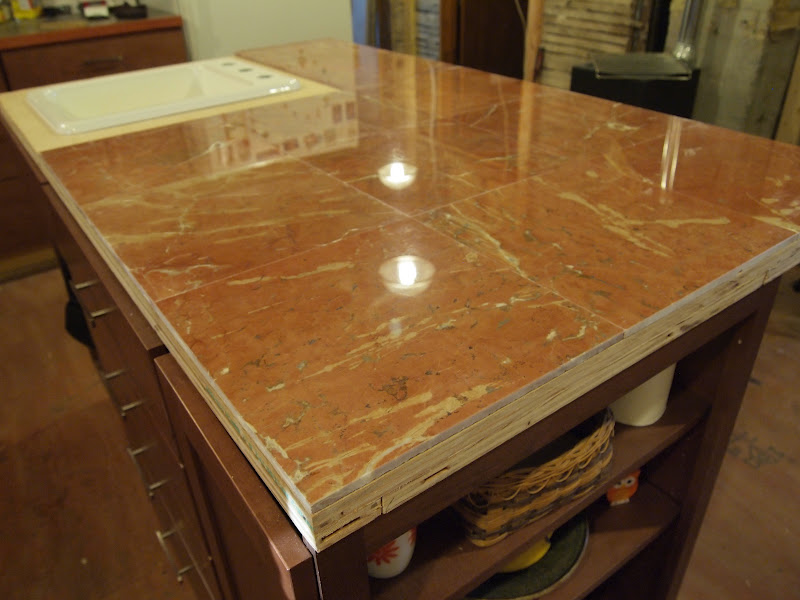
While I was waiting for dinner to cook tonight, I decided to clear all the junk off the island and take a look at the red marble I picked up last week.
You know, just to make sure they were all there...
See what they looked like...
Try them out...
I may have been swept into a vortex of red marble, and not been able to free myself...
It's very beguiling...
I ended up "dry fitting" the counter with the tiles that would fit.
Handling the tile and seeing how it looks has given me a profound sense of my inadequacy and inexperience. I am convinced I do not have the skills to do this right. But the bull headedness to try it anyway.
Troy did not temper my feelings by coming home, looking at the counter, and saying "Wow! That's too fancy for us." Yes, this tile is out of our league. But we'll try to measure up.
You know, just to make sure they were all there...
See what they looked like...
Try them out...
I may have been swept into a vortex of red marble, and not been able to free myself...
It's very beguiling...
I ended up "dry fitting" the counter with the tiles that would fit.
Handling the tile and seeing how it looks has given me a profound sense of my inadequacy and inexperience. I am convinced I do not have the skills to do this right. But the bull headedness to try it anyway.
Troy did not temper my feelings by coming home, looking at the counter, and saying "Wow! That's too fancy for us." Yes, this tile is out of our league. But we'll try to measure up.
Thursday, March 08, 2012
There and Back Again
On Sunday, Troy decided to work on the island. First thing was to move all the cupboards out of the way. We set them up in the corner (the table had already been relocated to the dining room) and I expected they would be there a while. So I made sure they were neat and tidy and still functional:
It was amazing once again how the big room feels without stuff in it!
Troy worked on exactly where the cabinet base needed to be. We had made marks before moving the cabinets, but of course he wanted to make sure it was square with the room, etc. Then he put in the plywood base and cut a hole in the floor for the plumbing.
Then we moved all the cabinets back where they had been. This is a good thing, but somehow it was a letdown. Done, already?
Anyway, once the cabinets were in place, we worked a while to get them placed exactly and shimmed so that Troy could screw them together permanently.
Then we went even further and added some of the decorative details I arranged. First was the decorative panel on the south end to cover the side of the open shelf unit:
I had started to get used to the look of the cabinet side and had started to wonder if I should have gotten the extra "fake" door. But then we put it on, and voila! it looks fantastique!
The we carried on to the north end where the sink will be:
Yup, all fake panels just for looks. But aren't they spiffy!
Really, I can't believe we are at finishing touches like this in any part of the kitchen. Time to catch up to reality!
On Wednesday, Troy finished the plywood base for the countertop. I wanted it to be 3x5' exactly because my tiles are 12" and are going in without any grout. Troy didn't like how the overhang worked out so he wanted to make it a little longer. I finally agreed to some partial tiles.
When I got home from work and it was done, however, Troy said that for this or that reason 3x5' was right and that's what he did. (It's almost like the island had been planned around a 3x5 countertop or something.)
We are still getting use to the shape. It looks a little funny hanging off the one end and the corners seem like they will get in the way. But we've gone two days without banging any hips against them and I think it's just a matter of getting used to it. I also think the overhang will look better when it has the proper "support" and facade built under it.
I tried to order the tiles I want from Lowe's the other day but I was bowled over by the price. I told her to hold off on the order and I talked it over with Troy. We decided I just wasn't used to spending money because it's been a while since we've had to make any big purchases. He woke up the next morning and told me that overnight he had decided that I just had to get the tile. That's good, because that's the way I was going to.
I'll look online for the same product and see if I get a better price, but otherwise I will bite that bullet.
All for now. Hopefully I'll be up for another big push on the tiling this weekend... (I've promised myself I may make the curtains when the tiling is done. I have the cutest fabric and can't wait!!)
-christina
It was amazing once again how the big room feels without stuff in it!
Troy worked on exactly where the cabinet base needed to be. We had made marks before moving the cabinets, but of course he wanted to make sure it was square with the room, etc. Then he put in the plywood base and cut a hole in the floor for the plumbing.
Then we moved all the cabinets back where they had been. This is a good thing, but somehow it was a letdown. Done, already?
Anyway, once the cabinets were in place, we worked a while to get them placed exactly and shimmed so that Troy could screw them together permanently.
Then we went even further and added some of the decorative details I arranged. First was the decorative panel on the south end to cover the side of the open shelf unit:
I had started to get used to the look of the cabinet side and had started to wonder if I should have gotten the extra "fake" door. But then we put it on, and voila! it looks fantastique!
The we carried on to the north end where the sink will be:
Yup, all fake panels just for looks. But aren't they spiffy!
Really, I can't believe we are at finishing touches like this in any part of the kitchen. Time to catch up to reality!
On Wednesday, Troy finished the plywood base for the countertop. I wanted it to be 3x5' exactly because my tiles are 12" and are going in without any grout. Troy didn't like how the overhang worked out so he wanted to make it a little longer. I finally agreed to some partial tiles.
When I got home from work and it was done, however, Troy said that for this or that reason 3x5' was right and that's what he did. (It's almost like the island had been planned around a 3x5 countertop or something.)
| Troy also got the hole cut for the sink. Obviously this is just a dry fit as it will have to go in over the tile. |
I tried to order the tiles I want from Lowe's the other day but I was bowled over by the price. I told her to hold off on the order and I talked it over with Troy. We decided I just wasn't used to spending money because it's been a while since we've had to make any big purchases. He woke up the next morning and told me that overnight he had decided that I just had to get the tile. That's good, because that's the way I was going to.
I'll look online for the same product and see if I get a better price, but otherwise I will bite that bullet.
All for now. Hopefully I'll be up for another big push on the tiling this weekend... (I've promised myself I may make the curtains when the tiling is done. I have the cutest fabric and can't wait!!)
-christina
Monday, January 02, 2012
My Own Private Island
There hasn't been a lot of progress in the kitchen lately. We've been visiting family and friends and enjoying the holidays. Troy's been playing with his new lathe. I've done a little more organizing (2 more boxes unpacked today!) but am having a hard time figuring out a lot of the remaining items. They either don't fit nicely into a category or are seldom used or...(fill in some other excuse)...
One of the issues is that we didn't have the island installed. There were things that I wanted to put there and couldn't. They were getting in my way, either literally or mentally.
Troy fixed that yesterday when he decided that he didn't want the island cabinets in the way in his shop anymore, and we moved them into the kitchen. We covered them with the counter top that we had been using in the dining room (cutting it to length) so that we could try it out before making anything permanent.
We started with the location specified by the plan, which gives a three foot lane between the island and the other counters. We may move it a little further away. As you look at the pictures, keep in mind that the counter will overhang about 12" on the side facing the camera in the above picture.
Even without the sink, it's been another treat! Lots more counter space! I haven't yet moved anything into the drawers because we still have to put the handles on, but I have marked them.
One thing I did do today was remove the doors and drawer front from the sink unit:
It's my idea to have the garbage here in this open cabinet, and you can see where I'm trying the paper towel dispenser. I was happy to learn that there's enough room for the compost bucket to sit there too. They are out of the walking lanes and still easily accessible.
Maybe you think it looks funny, but I am going with it. When Troy came home and saw it, he had the idea to put the drawer front back on so the paper towel would be dispensed through a slot:
We'll try it and see. I think it looks better than having the gaping hole.
I also filled up the open shelves at the end of the island:
I planned these shelves to echo the open shelves on the wall behind them. I filled them with cookbooks (finally out of my living room!) and stuff that used to be kept on the table. I am very committed to keeping the table clear of clutter and hope these shelves will keep things handy yet out of the way. :fingers crossed:
It's back to work for me tomorrow. I am not ready for it, but I wouldn't be any more ready for it even if I had another week off. I wish all of you a Happy New Year!
One of the issues is that we didn't have the island installed. There were things that I wanted to put there and couldn't. They were getting in my way, either literally or mentally.
Troy fixed that yesterday when he decided that he didn't want the island cabinets in the way in his shop anymore, and we moved them into the kitchen. We covered them with the counter top that we had been using in the dining room (cutting it to length) so that we could try it out before making anything permanent.
We started with the location specified by the plan, which gives a three foot lane between the island and the other counters. We may move it a little further away. As you look at the pictures, keep in mind that the counter will overhang about 12" on the side facing the camera in the above picture.
Even without the sink, it's been another treat! Lots more counter space! I haven't yet moved anything into the drawers because we still have to put the handles on, but I have marked them.
One thing I did do today was remove the doors and drawer front from the sink unit:
It's my idea to have the garbage here in this open cabinet, and you can see where I'm trying the paper towel dispenser. I was happy to learn that there's enough room for the compost bucket to sit there too. They are out of the walking lanes and still easily accessible.
Maybe you think it looks funny, but I am going with it. When Troy came home and saw it, he had the idea to put the drawer front back on so the paper towel would be dispensed through a slot:
We'll try it and see. I think it looks better than having the gaping hole.
I also filled up the open shelves at the end of the island:
I planned these shelves to echo the open shelves on the wall behind them. I filled them with cookbooks (finally out of my living room!) and stuff that used to be kept on the table. I am very committed to keeping the table clear of clutter and hope these shelves will keep things handy yet out of the way. :fingers crossed:
It's back to work for me tomorrow. I am not ready for it, but I wouldn't be any more ready for it even if I had another week off. I wish all of you a Happy New Year!
Subscribe to:
Posts (Atom)