Wednesday, May 08, 2019

If you wait long enough, even slow progress adds up

If this were a movie, the following would be a time lapse montage with inspiring music playing. (Got that scene set in your head?) Ok,

January 2018
The vanity wall has been redone and drywalled. (Reread this post for reminder of disaster.)

After that comes primer:
The bathroom and closet would have been done (primed) at this point.

March 2018
The vanity is installed (pictures coming below) and I put inserts in the back of the medicine cabinets. I covered them with wall paper. Nothing is permanently attached so it would be easy to change. Shortly after this Troy installed the shelves and that's what holds the insert in.

By April I had the bathroom and closet painted. It's a warm light tan colour (Valspar 3005-10B Gardenia if you're really curious. Depending on your screen settings, the picture in the link may or may not look like my wall.).
We had had water flowing since the previous November (2017). That was a very very happy day.
Troy installed the purchased mirrors with piano hinges to be the door of the medicine cabinets:

Moving on to the bedroom. The drywall went up at the same time as the bath and closet and I think was roughly done at the same time. Getting the bathroom done being our first priority, the bedroom lagged behind.

We got in a slog (cue the ominous music for our montage) about mudding and sanding, and it was not done for a long time.
A really long time. Meanwhile, Troy did get some doors installed in February of this year. I think it was just in time for the superbowl when we had some people over.
The bathroom and closet doors are in; the main bedroom door is not.

This happened at some point along the way:
A few months after we started using the shower, we noticed water in the office below. Troy really didn't think it was his plumbing (I mean, really! As if!) but he opened the wall anyway to confirm that yes, indeed, his plumbing was not leaking.

After more investigation, he saw that the caulk had failed and the water was seeping out where the shower wall met the tub. This shower/tub unit advertised that you didn't need caulk in large letters. Troy would have caulked anyway, but further in the instructions the instructions said that if you didn't use caulk, the unit may leak. What? I think they advertised you didn't need caulk because the walls are made of a material that caulk really doesn't want to stick to.

Troy super redid the caulk and we haven't had any trouble since. And we have a hole in the wall.

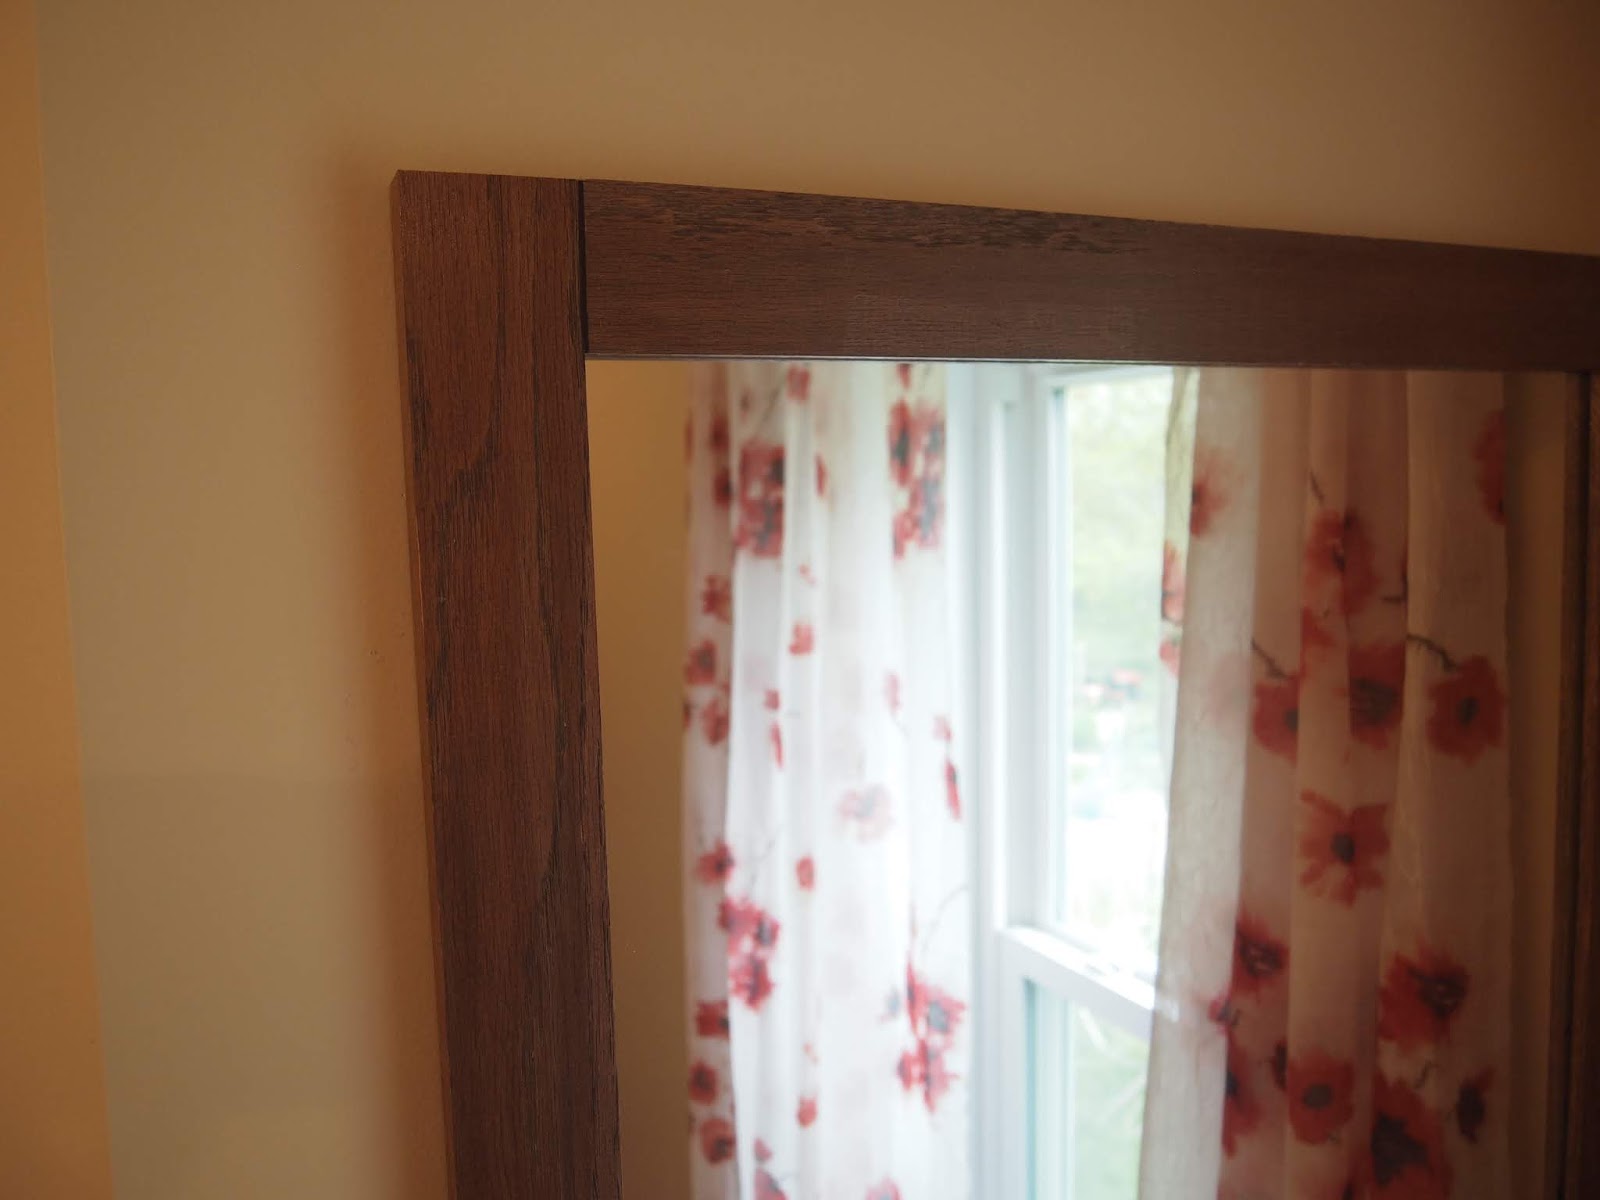
We decided to cover the hole with a mirror. A mirror we could remove later if needed. In other words an access panel.
The mirror is in a great spot at the end of the little hall between the closet and the bath. Troy did a great job finding matching trim and then detailing it to match the vanity mirrors.
The  mirror is hanging from a French cleat and is completely flush to the wall because the cleat is attached to the studs, which are recessed from the drywall. It really is slick. The other thing that tickles me about it is that we used a mirror we already had. It was large enough to cover the hole and the frame Troy built covered damaged parts of the mirror so it looks almost new. And cost us $0.

I think some time in May we declared the drywall done or we would have been doing it the rest of our lives. And I set to priming
and then painting. The walls are a light grey that looks purple, but mostly in daylight. Since I'm mostly in my room at night with the light on, maybe it will always look grey for me. :) (Valspar 4001-1B Winter Calm if you're curious.)
I also got the doors painted. Dark greyish brown (DutchBoy 447-7DB Velvety Night)
We went with silver coloured lever type handles and got enough for all the doors upstairs.
A current shot of the bathroom, where you can see the curtains I finally found and bought:
I would say I've looked long and hard and in the end I found them at Menard's, where we buy everything else for the renos. But only because I gave up on having linen.

The only wall decoration I've hung:
I found this cheeky cheetah and zebra pair at Goodwill a few years ago. No, please don't think I have a jungle theme going on! But they're snappy and match the brown/grey or gold/silver thing I've got going on in these rooms.

We're getting close enough to moving into the bedroom that I got serious about shopping for furniture. I wanted a narrower tall dresser for myself so it could sit right in the closet. (In fact, I'll be building the closet shelving/rods around it.) I found this curved beauty at one of the antique "malls" near here.
If you look closely at a picture further up (in the closet behind the partly open door), you can see the curved-drawer secretary that I just bought for my nightstand. They're not a set but they've got the same look and style.

And then at Goodwill, I found a pair of these chairs:
I love the little wing arms and they feel good to sit in. Yes, I'm a little leery of used upholstered furniture, but I really like these and they looked pretty good. They had zero smell as I drove home with two of them stuffed in my car so I take that as a good sign.

I was thinking I was going to reupholster them but Troy liked the existing fabric and since it matches my grey/brown theme, I'm going with it. I'm hoping one chair will fit in the closet (a place to sit to put your socks on) and the other can be in the bedroom. Otherwise I'll find room for them both in the bedroom. In case you're wondering, $10 each. I was going to paint the legs to match the doors but I don't have enough paint. Buy more now or wait until I'm painting the main bedroom door?

Currently, I am up to my eyeballs in trim, getting it painted and ready for Troy to install.
A priority since the baseboard needs to go in the closet before we finish up the storage part of it. I am dying to get my clothes in there.

Saturday, April 22, 2017

One Setback Leads to Another

It has not been a productive week, construction wise.

Troy and I moved the vanity into the bathroom so he could continue on the plumbing. What should have been a triumphant milestone moment quickly moved to confusion, then continued to disbelief and landed at resignation.

The medicine cabinets, sockets and light boxes that Troy carefully centered over the vanity didn't actually center over the vanity. It was off by only about 3 inches, but that's enough. And adjusting all of it 3 inches is just as much work as adjusting it 12 or 20 inches, but it hurts more.

On top of that, there wasn't enough room for where the toilet was supposed to go. After many minutes, we decided the vanity would moved into the far corner (against the east wall) and the toilet would go on the other side:
At least we have a good solution, but this means Troy will be redoing the entire wall behind the vanity. But that was going to happen as soon as we saw that the vanity wouldn't center. At least we found a solution that will work.
So Troy will need to redo that wall. It took a week the first time so he is figuring on that much time again. But maybe it will go quicker the second time.

And as soon as we moved the vanity, I knew I would have a problem in the floor that I will have to fix. See that big gap behind the toilet?
When I realized that was going to happen (my error), I thought long and hard about fixing it at the time. But it was going to be under the vanity and just how  much of a perfectionist was I going to be? Well, now it's not under the vanity but visible behind the toilet. Not a view I get a lot, but Troy will be looking at it every day. :) So I will be working on ripping out a row or two of flooring and redoing it. Is this what they mean by "misery loves company"?

The box with the vanity top was open so I snapped a picture.
I don't think I've shown it before. It's a dark brown. The undermount sinks are porcelain. It's not my favourite (I think I've mentioned that I wanted square sinks and would have liked a different finish) but even I have to limit how far I can apply my reasoning that if we're doing the work ourselves, we can buy more expensive supplies. In this case the limit was twice the price. (Although, to be honest, if Troy was less reluctant, I probably could have applied my logic to this case too!)

But don't worry...when I'm using those sinks in the bathroom right next to my bedroom, I will not be bemoaning the vanity top. I will be so happy to have plumbing. Upstairs and next to my bedroom!

Sunday, April 09, 2017

Bathroom Floor (and other things that are not as exciting as the bathroom floor)

If you're not following my Facebook or Instagram accounts, you may not know that I finished the bathroom floor on Friday night. Let's have some pictures, shall we?


I wanted to go to Chicago on Saturday, so I put my hours in during the evenings. Of course, it's easier to be more motivated when you're on the way to finishing something!

The bathroom flooring had to be done so the vanity and toilet could be put in. So, "tag, you're it" Troy!! :)

Troy has been working on putting in the plumbing for the shower:
 and he put in the tub surround:
Still more work to do on it, but the tub looks more finished and the surround pieces are out of the way where they were being stored. I love getting things out of the way!!

Monday, April 03, 2017

Not Burying the Headline

Let's start with first things first: I started putting flooring down this week:
This is the first flooring we've put down in this house. I am so excited about it.

Part of why I could get to it is because Troy finished the subfloor:
I didn't know he had more plywood in the shop. Much like the person who hides a puzzle piece and gleeful puts in the last piece, Troy filled in the last two gaps in our subfloor. Not that I minded.

He also framed the linen closet:
Can you make that out? Here it is from the back:
Easier to see?

Deciding there was nothing in the way of doing the flooring in the bathroom, I cleared the room and vacuumed on Friday night:


Saturday I rewatched the youtube video about putting down flooring and got to it:
As I told Troy before he left for the day--anything I did wrong couldn't take more than a week to undo!

Tuesday, March 28, 2017

Floors and Doors

Work continues...

After ripping out the rows of shims that were wrong, I did manage to finish all the shims in the hallway. Then I threw down some plywood:
Last Saturday, the plan was to finish the rest of the subfloor, which included the "seasonal" closet and the small section in front of the linen closet. (Both on the right in the picture above.)

Part of the reason that hadn't been done already is that the drywall for the bathroom was in the closet and I couldn't move it on my own. (I could barely get it from the trailer to upstairs with Troy pulling more than half the weight.) Or could I?

It turns out, when I need to, I can move around a full sheet of 5/8" drywall. Troy and I had planned to do it together, of course, but with me being sick and then Troy not feeling well, we didn't get it done. But I was determined now was the time because that floor was getting done!

So I got them into the bedroom, moving the last sheet of plywood and putting the drywall where it was. (The organization needed for a small work space!) The last sheet of drywall, of course, got cut up to go on the floor.
Most of the time was spent measuring and cutting the larger piece (lighter in the picture because its upside down) to fit around door posts and other irregularities. I was happy to have a scrap long enough and wide enough to install beside it (to the left) and managed to make them line up groove to tongue.

But then none of my scraps were big enough for the section in front of the linen closet or the last strip that was left at the far end of the seasonal closet. :(

Then I also started having trouble with the drill bits. Apparently I was replacing the worn/broken ones from the "cheap" supply and that's why. But I didn't know that until Troy go home. So I put in enough screws to hold everything in place and quit that for the day.

Let me tell, it is so nice to walk on a sturdy, solid, flat floor!! Even though it will take a while for my feet to learn the new floor. Meanwhile, it is still surprising my feet, which are walking the pattern of the old floor's ups and downs!

I still had time in my day, so I also cut off the bottom of the bedroom door so it would clear the new floor height and rehung it.
It's solid wood so cutting of the bottom didn't affect anything except the length. Even though we're the only ones in the house, it still feels better to have a door on the bedroom. :)

If I am remembering correctly, Troy finished the wiring of the vanity wall (lights, outlets, switches) and added an outlet to the closet side on that same wall. His new drill was a dream to work with.

He also figured a path for the antenna cable to get from the attic to the TV in the living room. It turned out to be simpler than he thought, which is nice for a change!

I have the bathroom area cleared of everything so I hope this week really is the week I start putting down flooring. Wish me luck!

Saturday, March 18, 2017

Mistakes and Lost Causes

No pictures today. It's been a frustrating week with not a lot of progress.

On Wednesday, Troy set to finishing the wiring for the vanity wall. He needed his drill that can make holes at 90° because he couldn't fit the "regular" drill between the studs. While he was using it, it made a bad noise and started smelling like burnt plastic. Never a good thing.

So he took it apart, discovered what was wrong, fixed it and put it back together. And then it did the same thing. So he tried again, and maybe even one more time. And then it still wasn't working. So he was done for the day and now he has a new drill.

It feels like a lot of wasted time, but at least now he can be very sure that getting a new one was necessary.

I, on the other hand, was still working on putting the shims on the hallway floor so the subfloor would be level. Last night I discovered that I used the wrong screw as a reference point not only on the strip that I had just installed, but also the previous strip where the glue was well-dried.

So I spent the evening with a hammer and crowbar removing the incorrect shims, grinding off or pulling out the brads, and cleaning up the surface so I could put shims down again. The glue gave pretty quickly on the old floor boards because they were painted, but there was another section where the shims were glued to some new lumber and that was some work. Troy ended up finishing up the cleaning with a chisel.

Now I should be all set to redo that work today. After thoughts last night of maybe finishing that section in one big push, I now have the same thought today. There's more to do, but I have more time too so we'll see.

It can be frustrating to go backwards but it hasn't happened very often to us so we're going to chalk this up to the cost of doing business.

Sunday, March 05, 2017

Building Up and Tearing Down

Since the last time I posted, we enjoyed a week-long visit to Troy's parents in Missouri. Troy got to practise with his new quadcopter that can record video. Here's a little snip of us waving "Hi" from the front deck:
We had a great time and you can read more about my visit to the Missouri Star Quilt Company in Hamilton, Missouri here.

After we got home, it took us a while to get back into work on the house. I also spent a few days sick with a cold so that week was a bust for me too. But some progress has been made...

Troy inserted plywood in the wall between the bathroom and closet where there was a big opening to house the medicine cabinets. You can see he also framed the "third wall" of the closet space (on the right).
He has to get those walls framed before I lay the floor.

Troy also started the wiring for the vanity lights and outlets.
Hmm...in this picture, you can only see the boxes, but he has some wiring started too.

Once that side of the closet was framed, I could also work on a layout. I could not find a useful online closet planner (that would let me plug in my own stuff) so I resorted to Excel.
I had to give separated areas for hanging clothes so Troy could separate
his nice clothes from his "grubby" clothes.
Troy needs a lot of hanging space since he hates to fold but doesn't mind hanging. (He even hangs his jeans--well he did when he owned jeans--and that is just crazy pants to me.) He has a dresser that we like, so I figured we could just build the rest around it. And that way he wouldn't have to spend the time building himself some drawers. And I filled the rest of the space with shelves.

Troy hasn't actually approved this plan yet but this was my first stab at it. Except for the top one, I expect the shelves will be adjustable so the spacing isn't all that critical at this point.

As for actual work work, I have scraped off the various finishes on the chimney.
We're going to be gluing either drywall or plywood then drywall and as Troy continually says, the glue is only as secure as the stuff you're sticking it to.

Of course, it's always fun to try and find all the layers from over the years.
1. Brick (not pictured)
2. Plaster (far left bottom corner)
3. Floral wallpaper
4. Striped wallpaper (that I hope was discoloured by subsequent layers because that is a very ugly brown.
5. More wallpaper I couldn't make out.
6. Paneling (all you can see that remains is the glue they used to stick it up).

Some came off, some didn't and by the end I had this on the closet side:
On the bedroom side, there was a lot less to remove. It is a mess of plaster and drywall mud though, including textured plaster that is just ick.

Along the one side, the plaster had given way and revealed the original brick:
I doubt it was ever meant to be a finished surface, but while the plaster was coming off, my head was filling with thoughts of tearing off all the plaster to reveal the bricks and how I could sand blast them to remove all the crap and I could maybe have that "mock" mantel or fake fireplace I keep dreaming about....But then, the plaster wasn't coming off anymore and I realized that it wasn't going to happen. And that it wouldn't even work because the chimney is way off to the side between two doors and it would look goofy. Anyway, all that is to say we will fill in the gap before we glue some drywall up and call it good.

Tonight I finished up the last little piece of subfloor in the closet space
so Troy can frame the linen closet. Then I think we will be done adding walls. I think.

You can see Troy crawling around on the floor in the picture--he is working on setting up the hallway so I can lay more shims there and put in the subfloor. It will be so nice to have the floor done! At the same time, Troy can even out the last flight of stairs (four steps) that are so uneven right now. Equal steps will mean less tripping, which is a good thing at the top of the stairs.

Sunday, February 12, 2017

More on Floors

That was a text exchange Troy and I had last Saturday while he was at work and I was working on the bedroom floor.

I had all the subflooring in the bedroom except the last piece that had to fit around the stove pipe:
Hence the text. And I think you can see what I mean about having nailed the shims over the metal plate along two edges. No one told me it was supposed to be free to move and I didn't ask.

But at the time it didn't quite feel right to just put the shims right over the metal, so about half of the edges were actually free and the parts that weren't were just barely trapped under the edge of the wood. So I decided a little careful prying would work. And it did.
I thought I took pictures of the completed bedroom floor, but apparently not. Above is a shot of the subfloor finished around the stovepipe after I moved most of the junk out of the bathroom into the bedroom. (Hence the piles of scrap.)

And why did I clear out the bathroom? Because that is the first room that's getting the finished flooring. Holy cow, I might have an actual finished surface in my house.

Troy got an email that the order was ready much earlier than we expected. So Friday he picked up a bunch of bamboo flooring and even got the bulk of it upstairs:
That should be enough for what we need now. We bought enough for the whole second floor so the rest of it is in the shop still.

Here's a picture of a few boards he "dry fit" together to see what it's like:
The boards are 5" wide but put together from much thinner strips. The weird spots in the grain are typical of bamboo.

We didn't get much work done this week. We had visitors at the beginning of the week and I was gone for the weekend at the end of the week.

Blog Archive