Showing posts with label tyvek. Show all posts

Tuesday, November 10, 2009

A Bit of Catching Up

What have we been up to? The blogging's been sparse and it's hard to think back on what's been getting done. (For surely, we've been getting something done!)

One thing Troy's been working on a little every day is filling in the hole around the chimney in our bedroom:
(Can you see the whiter white of the fill in?)

My co-workers still talk about the time when I could lay in bed and see the stars through the roof. Troy pretty quickly patched up the roof, but the ceiling's had a big hole ever since. I've resented all the heat that we've lost and all the dust that comes floating down. (The bedroom is by far the dustiest room in the house and that's saying a lot!)

Anyway, the gap is closing in and will soon be finished off with some sheet metal. Can I get a "woo hoo"?
WOO HOO!
Thank you.

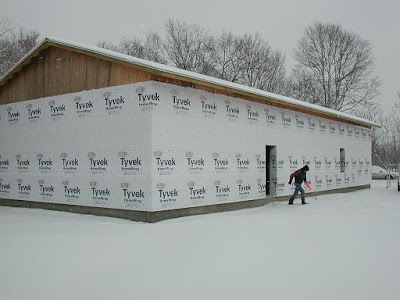
Troy and I together finished off the Tyvec on the upper portions of the east and west walls.
The east wall was done on a Wednesday evening.

And the west wall was done on a fine Sunday afternoon.

We're very close to ready for the siding Troy's ordered.

Troy's also done more tractor and shovel work to spread dirt between the shop and the house.
It'll still need some more to fill in a trough that's still there, but step by step it's getting there.

And then I came home to this:
Now, Class, can any one tell me what's wrong with this stove?
Anyone?
Yes, you in the back trying to hide behind the person in front of you...care to hazard a guess?
It doesn't have a pipe?
Why, yes, that's right. There's no stovepipe.

I was sitting at work at 3:30 this afternoon already telling my co-workers, "In five hours, I'll be sitting at home in front of a nice warm fire." I was looking forward to it all afternoon. (You may dream at work about Hawaii or Caribbean cruises or even Colorado ski slopes, but I just need my small square footage in front of the woodstove.)

But no, I walk into the living room and see a stove with missing appendages. (Nothing to do then but to make some popcorn and crawl into bed which is where I'm writing this right now!)

Troy eventually got home and explained that he was cleaning the pipe and took this portion out to clean off the rust (from when the top blew off and we had a lot of rain and snow falling into the pipe) and repaint it. This is very good in the big picture, and frankly it's not really cold this week, but the small child in me just wants to lay on the floor in a tantrum and yell, "Make me warm!"

Monday, December 22, 2008

Progress Illustrated

Here is the shop wrapped up in Tyvek (from the southwest corner). The top 9' strip along the south and west walls is what Joel and Troy put up last week. Troy and I then added the bottom strip. The hunched over figure is Isaac working through the cold.
Here is the north wall where Troy and I put up the bottom strip. I think this is all we're putting up until spring. It's very hard to get in there (scaffolding doesn't fit back there) and very difficult in the winter. And Troy is thinking the worst of the weather would hit the bottom of the wall; the overhang will help protect the top portion (we hope). Obviously the peak areas still have to be done as well but I haven't heard what the plan is for that. (I suspect more time spent in scaffolding and less time spent knitting for me...)

We put in a lot of these cap nails. I ruined a lot too...
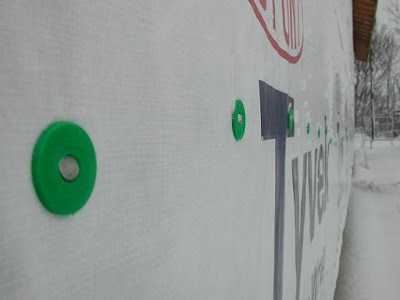
The new garage door:
and Troy's drywalling work too. I was surprised to see how far into the room he had to go on the ceiling. Here's a shot of the big-a** spring used to run it:
The garage guys still haven't come back to hook the motor up so Troy lifted it manually the other day. Apparently it is almost over balanced, and once you get it two feet up it practically lifts itself. This is good since Troy plans to add some more insulation and has no inclination to readjust the spring himself. (He had a shot to the head from a different big spring but that is another story.) The door runs very smoothly because when you order the high-end insulated version then you get all the other upgrades on hardware automatically.

The view out the north window:

And that is all. I'm trying to finish this up tonight while my sister is doing an origami project with Isaac (so I'm bored watching) and because I'm leaving in the morning. I didn't want to keep you waiting...

Sunday, December 21, 2008

We're Bad Neighbours

Friday night Troy said it was the night for us to finish up some more Tyvek. (Could you hear my little, "yippee"?) A friend had come by to help the previous weekend and he and Troy got up one strip along the top of the south and west walls. And they had to do it in very high winds which threatened to carry them away at every moment. (I was inside minding the fire, in case you were wondering.)

Well Friday Troy wanted to get the four foot strip of Tyvek done on the north wall...and more if we were good. He argued that it wasn't windy. (It wasn't.) It wasn't frigid. (But it was cold.) And there wasn't 2 feet of snow on the ground. (Now, only about 6 inches, but it was covered with ice so easy to walk on...?) In any case, out we went.

And not surprisingly, it went fairly smoothly. We did get the strip put on the north wall and then proceeded to the south and west walls. For that we had to lift the bottom of the strip put up previously to tuck this one under, but it all just takes time. Nothing hard about it, I mean. Troy got it cut out around the door and windows and I just kept hammering in cap nails. After a couple tries (i.e. time to warm up in front of the fire) we each found the right glove combo to keep our hands warm enough.

I told Troy he would be in trouble if all this hammering adversely affected my knitting. Troy optimistically said that maybe it would help my knitting. And although it did tire my forearm, I did not notice any negative impact. (Did I hear a "Phew!" from you? Why thank you!)

Oh wait! Why are we bad neighbours? Oh yes, that is because we were hammering those hundreds of nails in from 7:00 to 9:30. Now a good one would take a tap, BAM, BAM and it would be in. But a bad one would take up to a dozen hits (bouncy plywood). I'm sure the neighbours did not enjoy. But I'm sure they're learning that if it's not one noise with us, it's another. Troy at one point wanted to bring over some of my canned pears to make nice with them, but I told him that he could spend all day canning his own pears (and only getting 5 quarts out of it) to bring to the neighbours. I know, I'm not very nice, but I do shingle. Keep that in mind before you tut tut your condemnation.

The temperature now IS frigid so not much work is going to be done outside. Not much work is getting done inside, actually, besides keeping the woodstove stoked. The living room (where the woodstove lives) is having trouble getting above 60. For fun, Troy took out his remote infrared thermometer and started measuring temperatures in the kitchen. This is with the oil stove in there going. Various places in the room read in the 50s and 40s, but the coldest temperature was measured on the floor near the west wall: 36 degrees. **36**!! That's cold. No wonder the heating pipes there froze and burst last year.

Anyway, enough of that. Troy says he is working as fast as he can and I don't mean to give him a hard time.

Take care. Keep warm. Pictures to follow tomorrow if I can leave the living room.
-christina

Wednesday, December 17, 2008

Tyvek excitement


As we press on to weather-tightness, we get excited. The garage door is about 90% done and should be finished today. So that plugs the big windy hole, then there's just three small ones, two windows and a man-door.

We can't put those in until we get the tyvek house wrap installed. Joel volunteered to help out on that a few days ago. You can see it in the pic of the garage door, the shiny new white stuff on the wall. The rolls we are working with are 9' x 100'. Now I have to make a little detour before I can fill you in on the rest of the tyvek story.

Airplanes were not the first method mankind used to get airborne. Prior to that, both balloons (thanks to the Montgolfier brothers in 1783) and kites have been used to put people up in the sky. There are sketchy reports about the Chinese doing this centuries ago, but the details are lacking about exactly when and how.

Samuel Franklin Cody was probably the most visible and famous proponent of the "man lifter" kites. The British army and navy both paid Cody a substantial sum of money for both the hardware and the expertise for raising a person into the air with a big kite. See photo above. The lucky person in the basket could look for enemies, or torpedos, or make signals with the wireless telegraph and other tomfoolery. Airplanes pretty much put the manlifting kites out of business.

And now for the rest of the story. The day we chose to install the tyvek was not too bad. Not really cold, not snowing, not raining, that's all good. Not much snow on the ground. But man was it windy! We tried to roll it out and nail it down as we went, pretty successfully. But there were a few moments where Joel almost couldn't hang onto the roll, and/or almost got airborne. Tyvek is a lot like a 9x100 foot kite if you don't restrain it just right. Eventually, we got it all properly subdued and nailed down tight. A little excitement every week or two is a good thing, provided there is no arterial bleeding and no stopage of breath. Only 3 more rolls to go.

Finest regards,

troy

Tuesday, December 02, 2008

Keeping your walls dry, a tutorial

Keeping your walls dry on the inside is important for all buildings, including our shop. I noticed from Christina's last post, that there is a slight inaccuracy, which leads to this brief and important tutorial.

Most residential structures are built using wooden framing. A few use steel studs. Neither one like moisture inside the wall cavity and both can be totally ruined due to moisture problems. Here's how to avoid that.

In the old days, they just built houses that were really leaky to air infiltration. In an old farm house on a windy cold winter day, it is entirely possible to replace all the air in the house ten times an hour. These houses are about impossible to heat in any affordable fashion, but they were very resistant to moisture damage. Any moisture that got inside the wall got dried out by the huge volumes of air passing through.

These days, for energy and comfort reasons, most houses are considerably tighter than the drafty old farm house. The good news is that they use far less energy and are more comfortable and far more affordable. The bad news is that if moisture does get inside the wall, it will takes weeks or months to dry out. This can cause the wooden framing to rot in a year or two, or cause scary amounts of mold to grow, which can make a house unlivable and is very expensive to fix. The moisture also usually damages the insulation so it never works right again, raising energy use and cost forever. So, what to do?

In new construction, we use two different sheet plastic products. On the inside (warm side in winter) we install 6 mil (that's 0.006", or six thousands of an inch thick) polyethylene plastic sheeting. It's installed on the studs right before you do the drywall, and right after you do the wiring and plumbing inside the wall. Polyethylene is, for all practical purposes, impermeable to moisture, either liquid water or gaseous water vapor. It is commonly called a vapor barrier for just that reason. It prevents warm moist air from inside your house from migrating out through the nooks and cranies in your wall. If we do not prevent that moist air from getting inside the wall, the warm moist air eventually gets cooled off as it gets closer to the outside cold part of the wall.

When it cools off sufficiently, it suddenly can't hold all that moisture and water will change from a gas or vapor into a liquid. Now we have cold liquid water inside our wall where it can do its damage. A good vapor barrier prevents it from ever getting inside the wall in the first place.

A good installation will have every seam/overlap sealed with caulk and stapled. Every penetration (electrical wires, plumbing) sealed with caulk, or mastic or something. This is where good workmanship really pays off.

But, in this world, hardly anything is perfect. There are always little holes and tears and gaps, and perforations from the staples. So we must assume that small amounts of moisture can still get in the wall. That brings us to Tyvek or house wrap. That's the plastic sheet material on the outside, installed on top of the plywood or osb, just before the siding or bricks go on. House wrap is a peculiar polymer. They have discovered ways of manufacturing it so it has pores. The pores are generally big enough for gaseous water molecules (water vapor) to go right through it. Like heat, water vapor tends to go from areas of high concentration to areas of low concentration. In the winter time, the area of high concentration would be the errant water vapor inside your wall and the area of low concentration would be the great dry cold outdoors.

Tyvek allows any trapped water vapor to escape to the out doors. But the really neat trick is that the pores are generally too small for liquid water drops to penetrate much. So, liquid water can't get it, but water vapor CAN get out. Tyvek also serves as an air intrusion barrier, to prevent cold air from entering the wall, and discouraging warm conditioned air from leaving the house.

So, Polyethylene on the inside (which is what we are doing now, in prep. for drywall) and Tyvek goes on the outside, which we will do right after we get the big garage door installed.

If you have an old house, there is no good way to fix this without tearing into the walls. You can vent moisture pro-actively from the kitchen and the bathrooms. You can buy special "vapor barrier" paint. You can caulk every crack and hole you can find, inside and out. That will all help, but will not be a guarantee. You could also do an air-to-air heat exchanger in either the old remodeled house or the new-construction house. Both help control humidity levels to (help) prevent moisture damage.

I am very happy to have the roof done and hope to never do another in my life. We'll see, I am generally cautious about using the "never" word, as you never know what God will send your way. I'm totally convinced He has a sense of humor.

Finest regards,

troy

Tuesday, April 01, 2008

Winning the war against cold.

OK, technical update for those interested in remodeling an old house.

As you can see from the photographs posted by my lovely wife, we gutted our dining room. I tore the plaster off, then the lath boards, then removed the (spotty and inadequate) cellulose insulation. So, right down to the bare studs. There is nothing quite as dirty or quite as satisfying as tearing plaster off a wall with a sledgehammer and a crowbar.

I debated for a time about leaving all the old stuff in place, and just building the additional wall to give us 12” thick walls when finished. The old walls would contribute some insulating power, and the new insulation/wall would do most of the work.

The problem is two fold. First, I really want to control air infiltration. On a windy day, the effectiveness of most insulation can drop dramatically if air infiltration is not controlled. This is especially true for fiberglass insulation. The reduction can be as much as 50% and it happens when you need the r-value the most.

With new house construction, this is easy. Just wrap the house in Typar or Tyvek on top of the plywood sheathing (before the siding or bricks), and you’re done. Of course, I don’t have that luxury since I am not tearing the siding off my house. As an alternative, I put the “house wrap” on from the inside. I cut a piece of Tyvek for each stud bay and staple it up. If you examine the photos, you see that the Tyvek makes a “C” shape in cross section, since it’s installed on the left stud, the wall sheathing and the right stud.

Once the cellulose is blown in, this will push the Tyvek tight against the studs and sheathing, and will help seal the house wrap to the framing, reducing air infiltration. Without tearing out all the old plaster, insulation, etc, I could not install the Tyvek in the proper place.

The second half of the problem is the fact that this is an old house. I really want and need to know what’s inside those walls. So far, we haven’t found any bad concealed termite damage except in the basement. That’s the nasty “swiss cheese” wood you see in the other photo, now gone/replaced. But the previous insulation job was absolutely terrible. Either they did it themselves, and badly, or a contractor did it and figured the owner wouldn’t know the difference because you can’t see it. I would estimate that 30-40% of the wall was uninsulated.

So the general idea is to tear the old stuff out right down to the studs. Line the wall with Tyvek, build a second wall to make the total thickness ~12”, install all new wiring and plumbing as needed, then a new vapor barrier, then dry wall. Then we blow a foot of cellulose into the wall, finish the drywall then paint and trim. This technique works well for big older homes with nice big rooms, since you will lose at least eight inches on every outside wall. For a house with smaller rooms, you need other techniques like adding the insulation on the outside, or using super high r-value insulation where you can get away with a 6-8” total depth.

That's it for now, tune in soon for further exciting developments.

troy

Blog Archive